Replicate Google Homepage using HTML and CSS

I am a front end engineer who loves to code and built web apps.
So, a few days back I thought of furnishing my HTML and CSS by replicating Google Homepage. First, I thought it will be easy because there are not many elements to put. But when I started replicating it, I came to know that it was not that easy to work with HTML and CSS.
Especially with CSS, it was a bit challenging and I realized that I still need some more practice with it. I have learned so much while working on it.
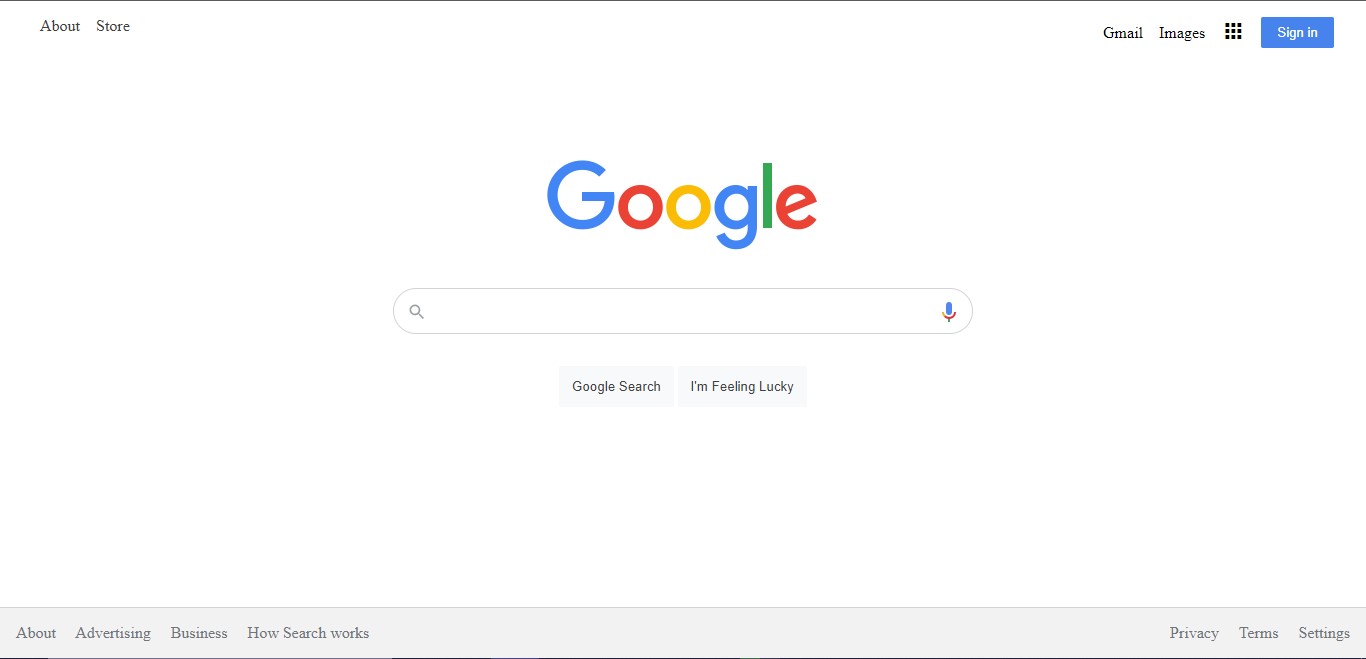
Overall it was quite a fun experience. So, I thought of sharing it by writing about it and how I finally achieved the end product which looks like this 👇
P.S. It's for beginners who just started their journey of web development with HTML and CSS.
Pre-requisites
- Basic knowledge of HTML and CSS
- Any code editor
- Any browser
So, let's go through the step-by-step process of creating it.

- First create a file
index.html. In this file, we will put all our HTML code and create the structure of the homepage.
Let's start with creating a navigation bar.
<html lang="en" dir="ltr">
  <head>
    <meta charset="utf-8" />
    <title>Google</title>
    <link
      href="https://fonts.googleapis.com/icon?family=Material+Icons"
      rel="stylesheet"
    />
  </head>
  <body>
    <header>
      <navbar class="container">
        <div class="navbar-container-one">
          <ul>
            <li><a href="#">About</a></li>
            <li><a href="#">Store</a></li>
          </ul>
        </div>
        <div class="navbar-container-two">
          <ul>
            <li><a href="#">Gmail</a></li>
            <li><a href="#">Images</a></li>
            <li><i class="material-icons">apps</i></li>
            <li><button class="signin">Sign in</button></li>
          </ul>
        </div>
      </navbar>
    </header>
For creating a navigation bar, we use header and navbar tags. Using these tags rather than the div tag makes the code more understandable and readable for others. As you can understand, we have divided the navbar into two parts.
In the first, there are two links created using the a tag and in the second, there are two links, one icon and one button using the button tag.
You can use any icon from here by Google for free.
- Now, let's style our navbar by using CSS but first we have to create an external stylesheet named
styles.cssand link it to theindex.htmlfile in theheadtag.
<head>
     <link rel="stylesheet" href="styles.css" />
</head>
- Now, our stylesheet is created and linked to an HTML file. We can now use it to style our homepage.
body {
  margin: 0;
  padding: 0;
  top: 0;
}

.container {
  display: flex;
  justify-content: space-between;
  flex-direction: row;
  padding-right: 2rem;
}

.navbar-container-one ul,
.navbar-container-two ul {
  list-style-type: none;
  display: flex;
  flex-direction: row;
  align-items: center;
}

.navbar-container-one ul li a,
.navbar-container-two ul li a {
  padding-right: 1rem;
  text-decoration: none;
  color: #404040;
}

.navbar-container-two ul li a {
  color: black;
}

.navbar-container-two ul li i {
  padding-right: 1rem;
}

.navbar-container-two ul li i:hover {
  color: #404040;
  cursor: pointer;
}

.navbar-container-two ul li .signin {
  background-color: #4683ec;
  border: none;
  padding: 0.5rem 1rem;
  color: white;
  cursor: pointer;
}

.navbar-container-one ul li a:hover,
.navbar-container-two ul li a:hover {
  text-decoration: underline;
  color: #404040;
}
After styling the navbar, it will look something like this 👇

- Second, let's create the main part of the homepage. The brand logo and the search bar.
<main>
      <div class="brand">
        <div class="brand-img">
          <img
        src="https://www.google.com/images/branding/googlelogo/1x/googlelogo_color_272x92dp.png"
          />
        </div>
        <div class="search-bar">
          <img src="images/search.png" class="search" />
          <input class="search-input" />
          <img src="images/mic.png" class="mic" />
        </div>
        <div class="bottom-buttons">
          <button>Google Search</button>
          <button>I'm Feeling Lucky</button>
        </div>
      </div>
    </main>
A little challenging part for me is creating the search bar with two icons left and right. But after so much searching and trying some methods. Finally, I will be able to achieve it.
If you are having difficulty in finding the logo. You can download it from here.
- Now, it's time to style the main part.
.brand {
  display: flex;
  align-items: center;
  flex-direction: column;
  margin-top: 6rem;
}

.search-bar {
  display: flex;
  align-items: center;
  justify-content: space-between;
  box-sizing: border-box;
  border: 1px solid #d3d3d3;
  border-radius: 30px;
  margin-top: 2rem;
  margin-bottom: 2rem;
  padding: 0.6rem;
  width: 580px;
}

.search-input {
  width: 90%;
  border: none;
}

.search-bar:hover {
  box-shadow: 1px 2px 10px 1px #d3d3d3;
}

.bottom-buttons button {
  border: none;
  padding: 0.8rem;
  background-color: #f8f9fa;
  color: #404040;
  cursor: pointer;
}

.bottom-buttons button:hover {
  border: 1px;
  box-shadow: 1px 2px 10px #d3d3d3;
}
It will look something like 👇

- Let's move to the last part of the homepage, the footer, it is somewhat similar to creating a navbar.
<footer>
      <div class="footer-bar">
        <div class="footer-one">
          <a href="#">About</a>
          <a href="#">Advertising</a>
          <a href="#">Business</a>
          <a href="#">How Search works</a>
        </div>

        <div class="footer-two">
          <a href="#">Privacy</a>
          <a href="#">Terms</a>
          <a href="#">Settings</a>
        </div>
      </div>
    </footer>
  </body>
</html>
- Styling the footer.
.footer-bar {
  position: fixed;
  display: flex;
  flex-direction: row;
  justify-content: space-between;
  bottom: 0;
  background-color: #f2f2f2;
  padding: 1rem;
  width: 100%;
  border-top: 1px solid #d3d3d3;
}

.footer-two {
  padding-right: 1rem;
}

.footer-bar a {
  color: #70757a;
  text-decoration: none;
  padding-right: 1rem;
}

.footer-bar a:hover {
  text-decoration: underline;
}
Footer will look like 👇

And with that, we have finally achieved what we had seen in the starting.
Hope all the beginners find it helpful.
You can find the complete GitHub source code in this repository.
You can see the live demo of it here.
Also, if you don't know what is netlify and how to deploy your project there. I had written a full demo article. You can read it here.